NOTE: Read this article before you start do anything
https://blogs.technet.microsoft.com/enterprisemobility/2016/09/09/configuration-manager-and-the-windows-adk-for-windows-10-version-1607/
I don’t know if this is a good way to update ADK 1607 and custom the winpe.wim, that is how I did it. Since I have not been any MS events, classes or trainings. Honestly I have been only one day SCCM class in my career as an IT. So don’t trust everything what I said. 🙂
PS. if this it not a correct way to do, please let me know and comments are always welcome.
First: Update ADK 1607
- Download ADK 1607 https://developer.microsoft.com/en-us/windows/hardware/windows-assessment-deployment-kit
- Uninstall earlier version of ADK.
- Install ADK 1607.
- Install to default path C:\Program Files (x86)\Windows Kits\10\
- These are the basic components you must install.
Deployment Tools, Windows Preinstallation Environment, User State Migration Tool - After ADK 1607 is installed, restart your server
Second: Custom default winpe.wim
Why do I custom the winpe? Well I want every boot image I am going to create has the language, keyboard layout, and timezone which are suitable for me, I don’t want to mount and umount my boot image each time. (I am lazy.)
- Create a folder C:\WIM
- Create a folder C:\WIM\Mount
- Copy “C:\Program Files (x86)\Windows Kits\10\Assessment and Deployment Kit\Windows Preinstallation Environment\amd64\en-us\winpe.wim” to C:\Temp\WIM
- Change “C:\Program Files (x86)\Windows Kits\10\Assessment and Deployment Kit\Windows Preinstallation Environment\amd64\en-us\winpe.wim” name to winpe.wim.bak
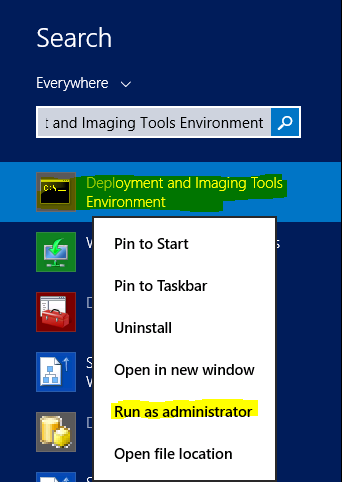
- Run Deployment and Imaging Tools Environment as administrator

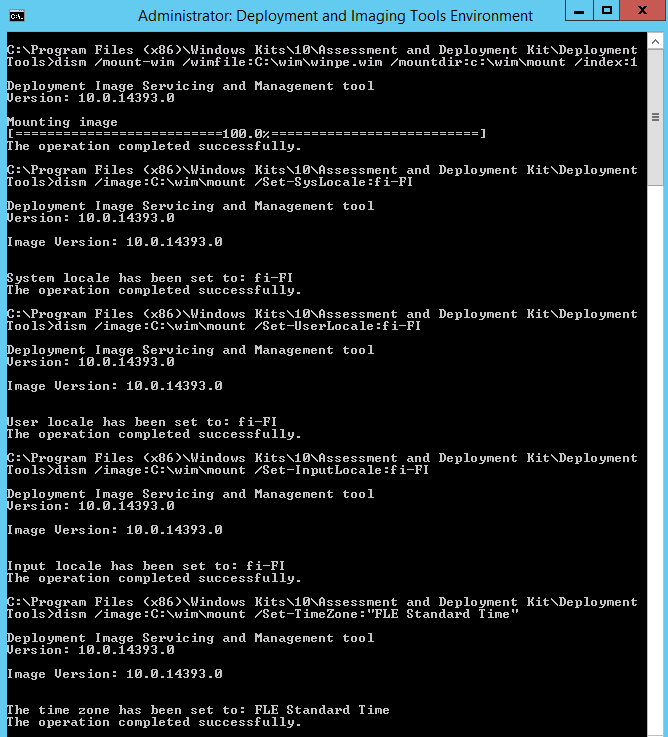
- Modify, copy and paste those dism lines what are suitable for you, and run it:
# Mount winpe.wim to c:\wim\mount folder
dism /mount-wim /wimfile:C:\wim\winpe.wim /mountdir:c:\wim\mount /index:1#set your timezone, in my case I use “FLE Standard Time”
dism /image:C:\wim\mount /Set-TimeZone:”FLE Standard Time”#(Optional) if you are using other language than English, you can use these to set your winpe enviroment. Example: in my case is “fi-FI”
dism /image:C:\wim\mount /Set-SysLocale:fi-FI
dism /image:C:\wim\mount /Set-UserLocale:fi-FI
dism /image:C:\wim\mount /Set-InputLocale:fi-FI
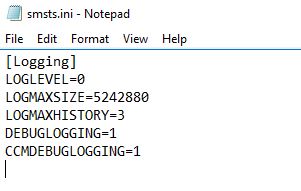
- Create a new file name smsts.ini in C:\wim folder

- Copy and paste these to the smsts.ini file and save it.
[Logging]
LOGLEVEL=0
LOGMAXSIZE=5242880
LOGMAXHISTORY=3
DEBUGLOGGING=1
CCMDEBUGLOGGING=1
- Copy smsts.ini file to C:\WIM\Mount\windows
- (Optional) Add Active Directory Module if you need it. Mick Pletcher has a blog post about it. Read here
- (Optional) Add Dell Command PowerShell Provider Read here
- Unmount and save the winpe.wim
#unmount and commit changes
dism /unmount-wim /mountdir:c:\wim\mount /commit
- Copy C:\WIM\winpe.wim to “C:\Program Files (x86)\Windows Kits\10\Assessment and Deployment Kit\Windows Preinstallation Environment\amd64\en-us\

NOTE: Repeat 1-11 for x86 boot winpe image if you deploy 32bit machines.
Third: Update OSD boot image for SCCM
Use the script https://gallery.technet.microsoft.com/RegenerateBootImageWinPE10-f508f1e4
NOTE: Read the instruction how to use this script, it will update your older version of OSD boot image to the newest version, but it doesn’t update you custom made boot image, example MDT boot image.
At last: Create/Update custom boot image
If you are using custom made boot image, example MDT boot image, you will need to recreate that again. You can use this script to reimport your drivers from you older boot image. download here.
NOTE: When I test this script, I noticed that script itself is just a function, you can either use import-module to import this script, then run it. or you can use my modified script. Download here