Long time ago I have built Azure Point to Site VPN at home, in that point I thought I have to buy a hardware device for site-to-site VPN. Since work from home and VPN became a hit topics recently, I really want to try again build site-to-site VPN at my house. The reason I wanted this, I am hoping extend my on-premises domain controller to Azure, then install ADFS server on Azure, so that I can continue test windows virtual desktop with SSO. (I know you wonder why I planning use ADFS, because of many customers are still using ADFS, I want to practice migration later. )
I am using Lenovo ThinkPad P1 as Hyper-V host, on top of that I have build my test lab. In this blog post, I only use my domain controller network configuration as example. In Lenovo ThinkPad P1, I cannot bind it’s wifi adapter to external network hyper-v virtual switch. If I do so, my P1 wifi network speed will drop 99%, I can only create internal network Hyper-V virtual switch, then configure NAT using PowerShell or RRAS, my setup might a bit more complicate than usual.
Before I go into any details, I want to give shout out for Travis Roberts, his YouTube video helped me configured Azure Site-to-Site VPN.
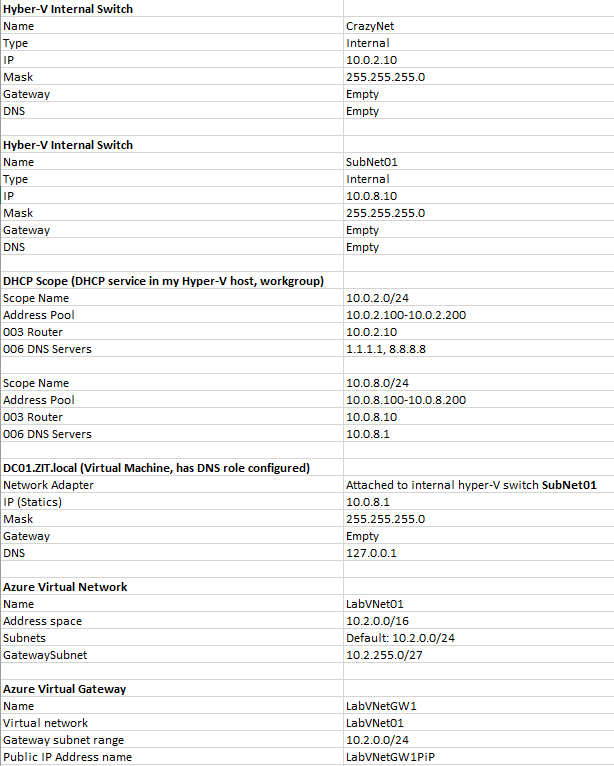
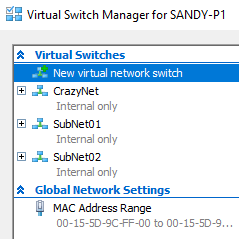
Here are my network configuration for my home lab, you don’t need DHCP or Domain controller for site-to-site VPN, I am just showing how my home test lab has been configured. I have three internal network virtual switch, “CrazyNet” is for internet only devices, so that it won’t find my test lab domain. SubNet01 is for internal zit.local domain devices. I will focus only on “CrazyNet” internet faced devices in this post.
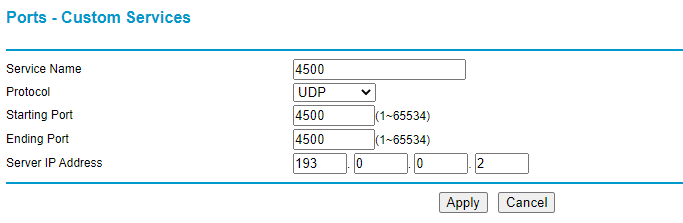
IMPORTANT: Before you start testing this, make sure your home router support port forwarding, my home wifi gives me ip address 193.0.0.2, I have configure my wifi router port forwarding UDP port 500 and UDP 4500 to my IP. You need these two ports for Azure Site-to-Site VPN. For example my router:
Create Hyper-V virtual switch
This internal virtual switch acts like gateway for your internal/on-premises network, you can then attach this virtual switch to your virtual machines, use this virtual switch ip address as gateway address.
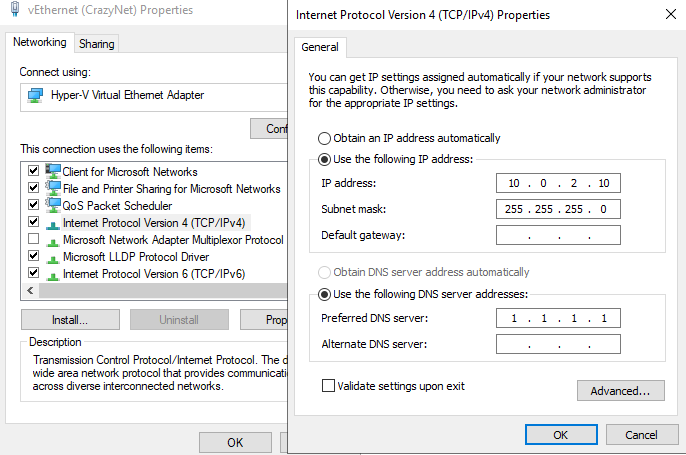
- Create a hyper-v virtual switch with internal network, I name it CrazyNet
- Configure it’s ip as 10.0.2.10, subntet mask: 255.255.255.0. Leave default gateway and DNS be empty.
Create Virtual Network
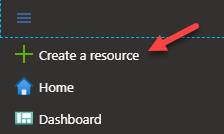
- Choose create a resource
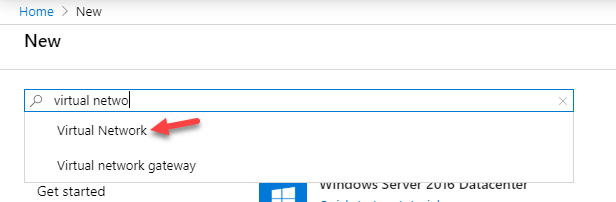
- Start typing “virtual network”, we should see it shows up Virtual Network as option.
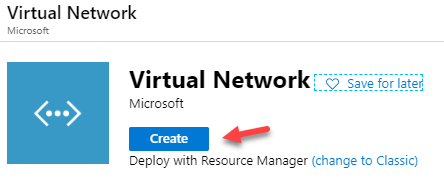
- Choose Virtual Network, and create a new network
- Choose your Subscription, and choose your resource group. Or create new resource group. Here I use LabVNet01 as my virtual network name. Choose region based on your geographic
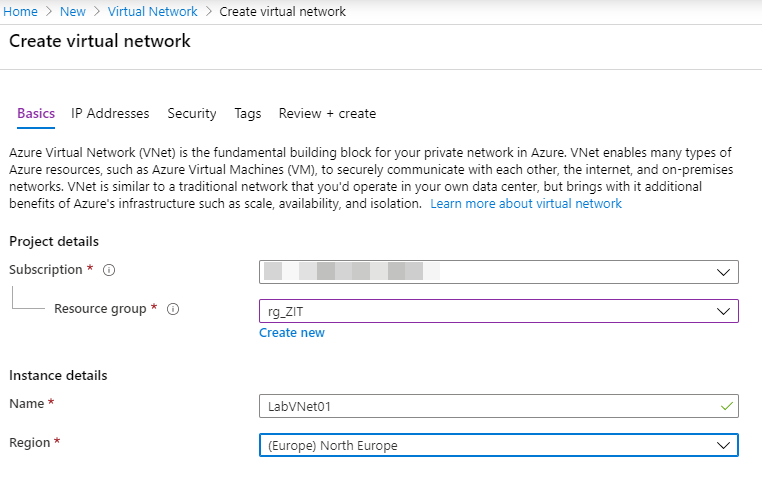
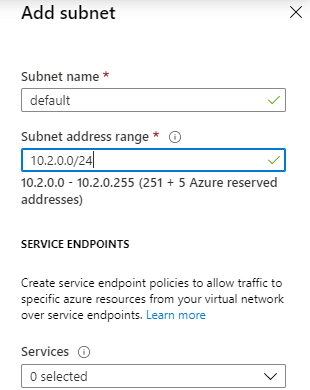
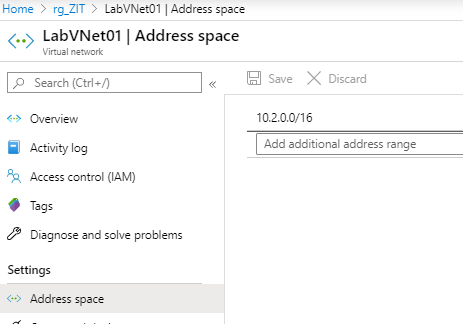
- Go to next page to configure IP addresses. I use 10.2.0.0/16 as my IPv4 address space, and I need to create a new subnet. For the new subnet, I use name: default, subnet address range: 10.2.0.0/24
IMPORTANT: This is ip range for your Azure Network, not your on-premises network, don’t overlapping your ip range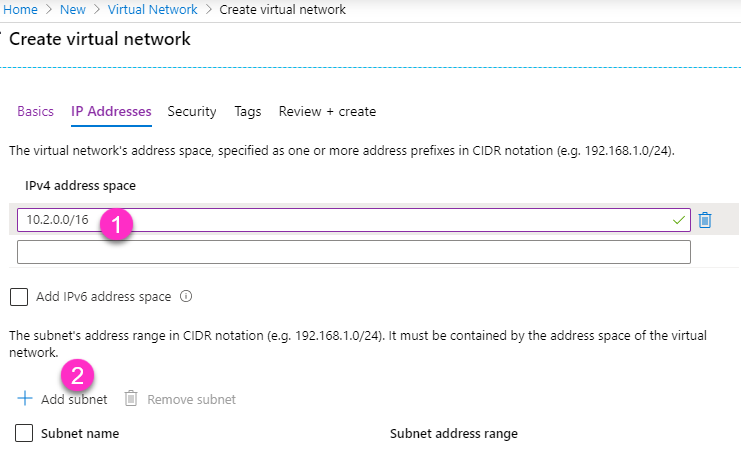
- We can leave all other settings as default, just click Review + create, then create our new virtual network. This won’t take long.
Create Virtual Network Gateway
- Same as above, create new resources, then choose Virtual Network Gateway
- I use these following details
Name: LabVNetGW1
Region: (Europe) North Europe (you can choose a different region)
Gateway type: VPN
VPN type: Route-based
SKU: VpnGw1
Generation: Generation1
Virtual network: here choose the virtual network what we just created, LabVNet01
Gateway subnet address range: I put here 10.2.255.0/27, it will automatically create Gateway subnet for me in VirtualNetwork
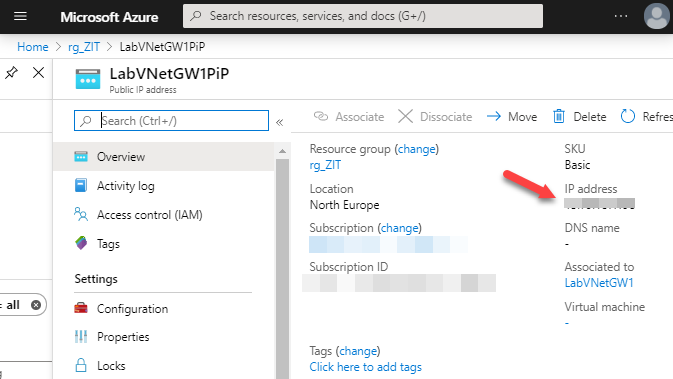
Public IP address: Create a new public IP address, give a name call LabVNetGW1PiP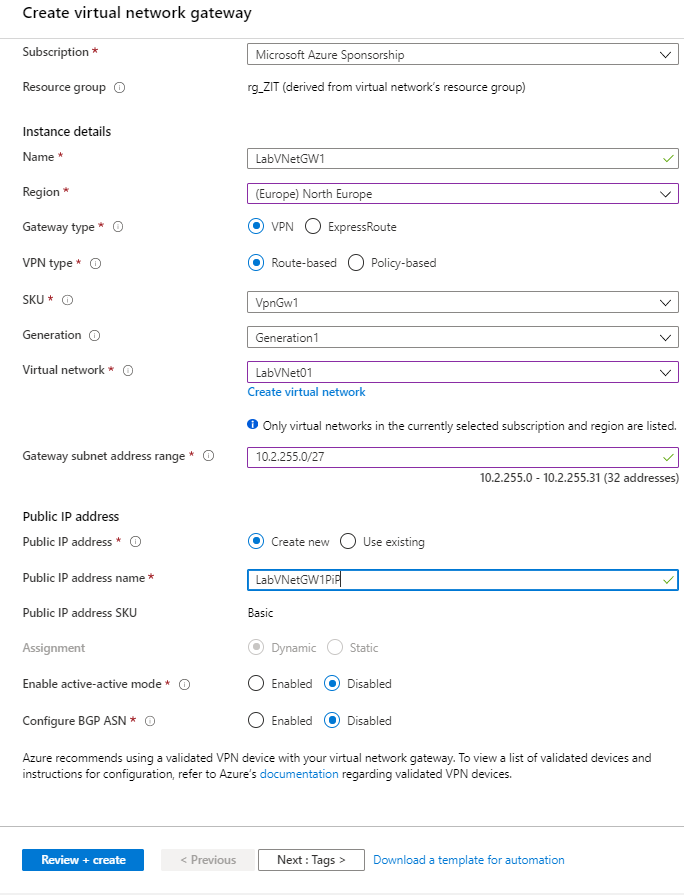
- We can leave other settings as default, click on Review + create. This will take about 20-25 min.
Install and configure Routing and Remote Access Service
While we are waiting for virtual network gateway creating, we can go ahead install and configure routing and remote access service in my Hyper-V host machine
Install routing and remote access service
- Install Remote Access role
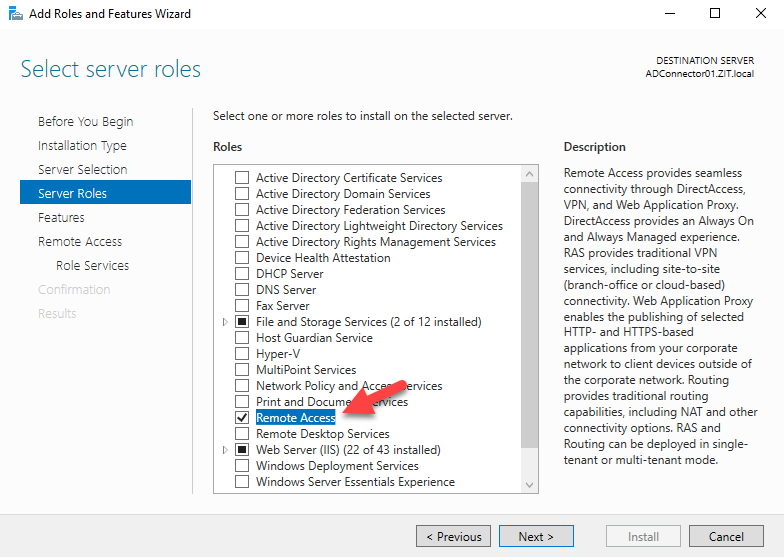
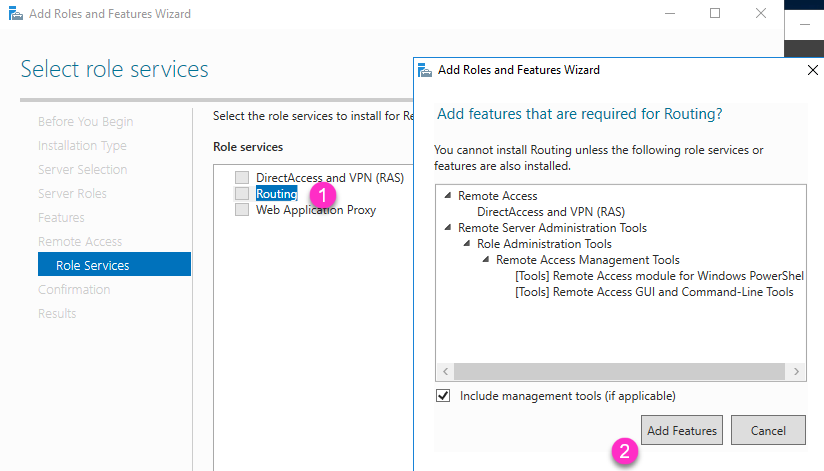
- Choose Routing , it will popup Add Roles and Features Wizard, choose Add Features, then just click next, then install.
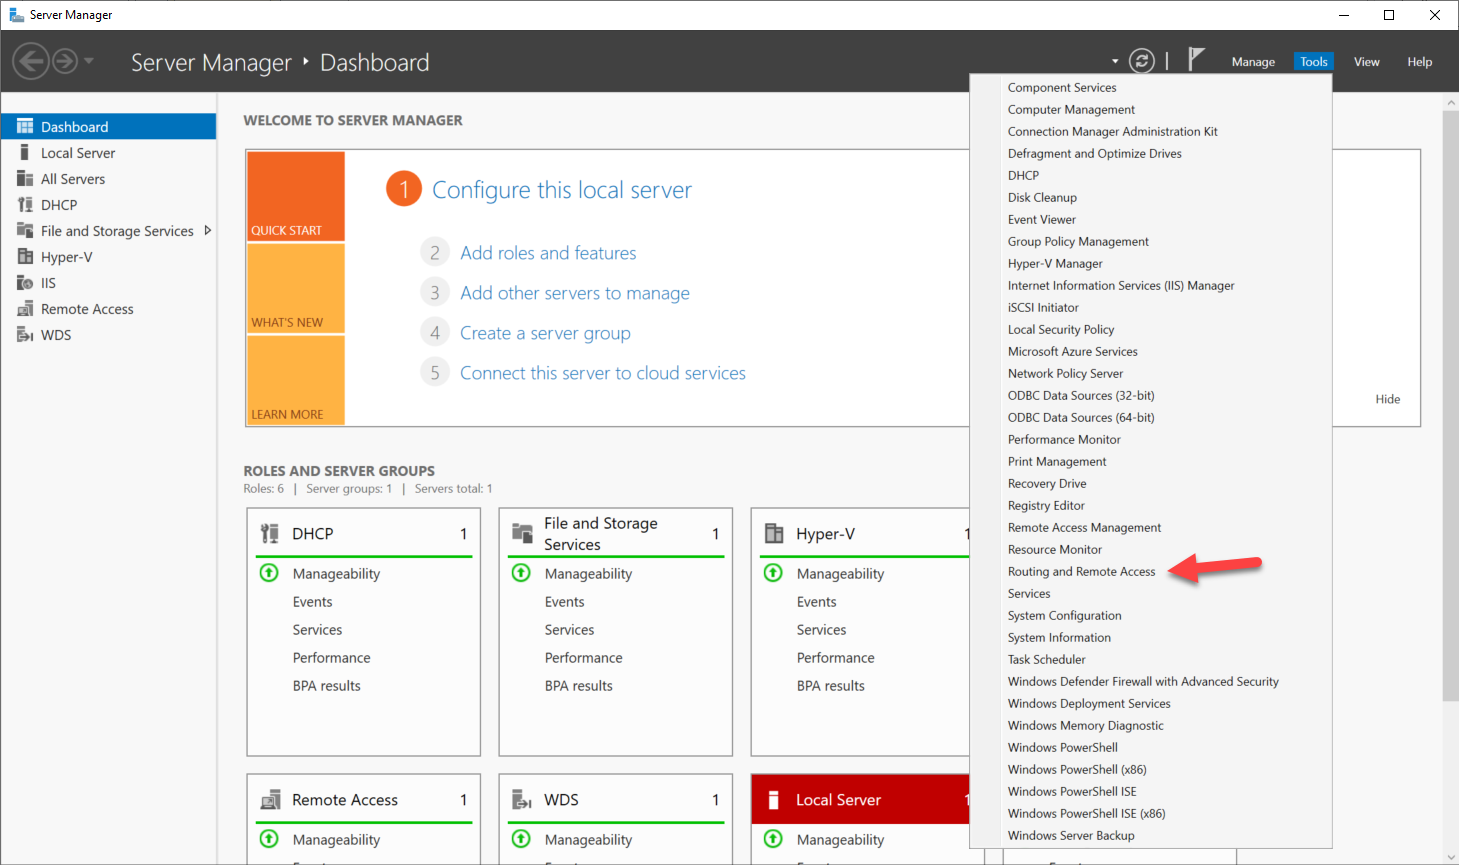
- After Routing and Remote Access service is installed, open it’s management tool from Server Manager–Tools–Routing and Remote Access
Create Demand-Dial Connection
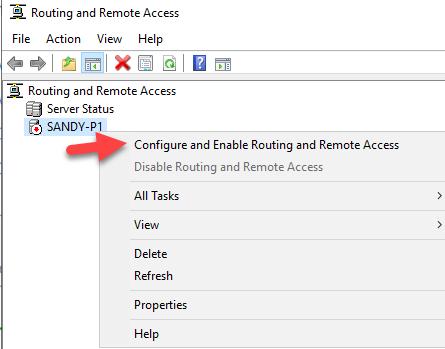
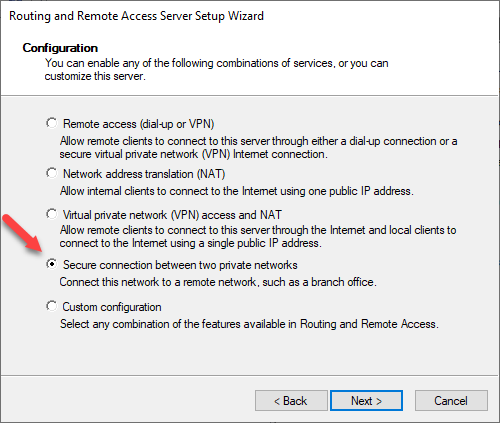
- Right click your server name, choose Configure and Enable Routing and Remote Access
- Here we choose Secure connection between two private networks
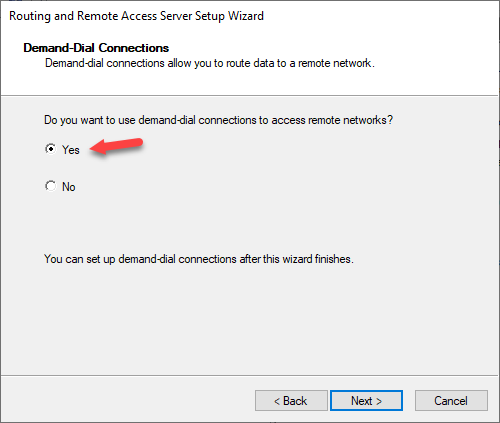
- Choose Yes for Demand-Dial Connections
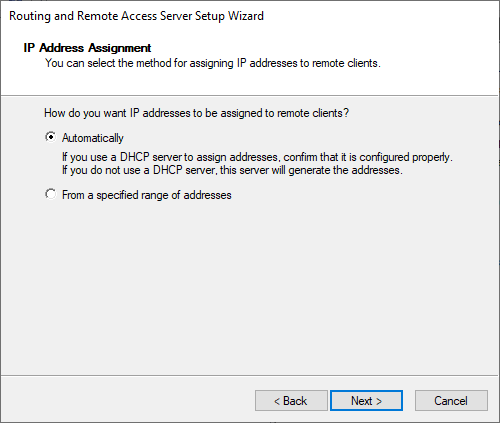
- In here I use Automatically for IP address assignment
- Finish the wizard
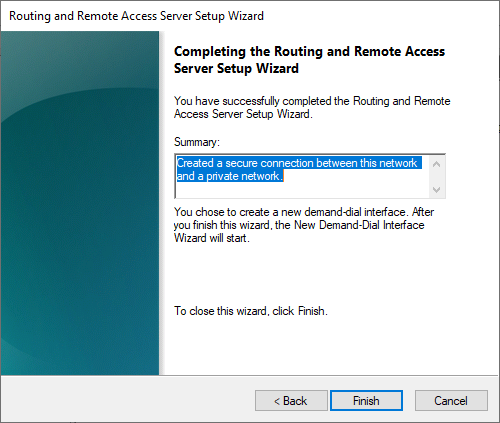
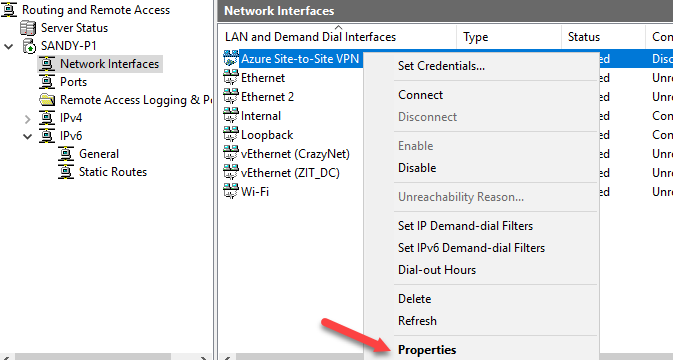
- After finished the wizard, it should launch the Demand-Dial interface Wizard automatically. If it doesn’t or you want to re create that again, you can right click on Network Interfaces, then create a new Demand-Dial Interface. I put my interface name: Azure Site-to-Site VPN

- Connection Type should be Connect using virtual private networking (VPN)

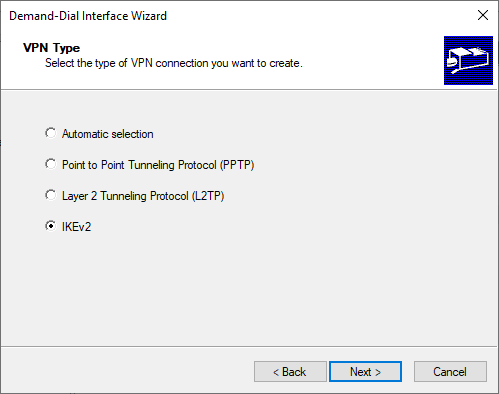
- Choose VPN Type IKEv2
- In Destination Address, we need to put our Azure virtual network gateway public IP. We can find this after virtual network gateway public ip resource is created from the earlier step.

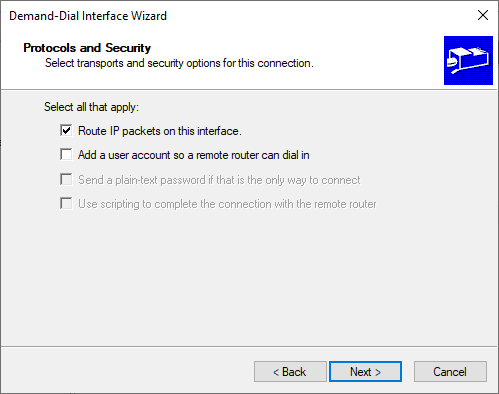
- Protocols and Security will be use Route IP packets on this interface
- It seems there is bug in Windows Server 2019, static routes doesn’t show up even I have configured them in this step, so let’s just skip it in here and just click Next.
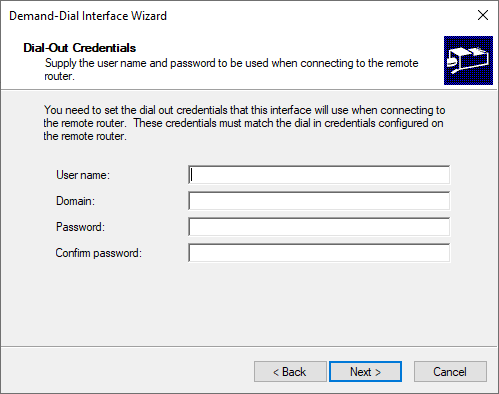
- We don’t need user credentials here, leave it as empty and click Next, we can finish the wizard
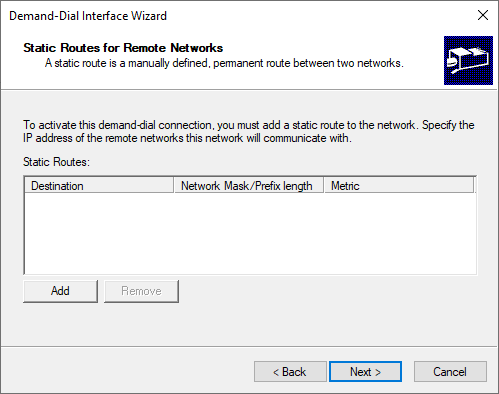
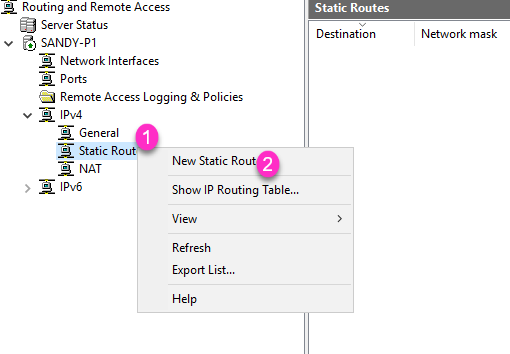
Create Static Routes
- Create new Static Route
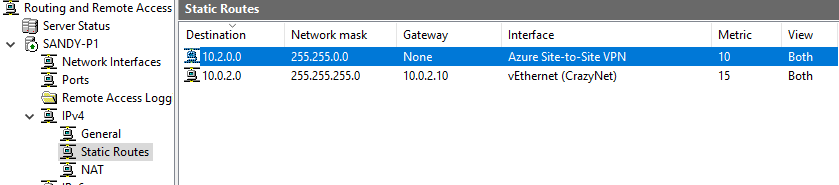
- In Azure virtual network, we have configured IPv4 address space 10.2.0.2/16, so here we put Destination ip 10.2.0.0, Network mask: 255.255.0.0. Change Metric to a smaller number (higher priority)
You can use any free IP Calculator online services to calculate network mask and ip range for you.
Configure Azure Site-to-Site VPN connection share key
- Open you Demand-dial connection properties
- Go to Security tab, change it use preshared key for authentication. For example: YouAreSoAwesome.
We will need this key later.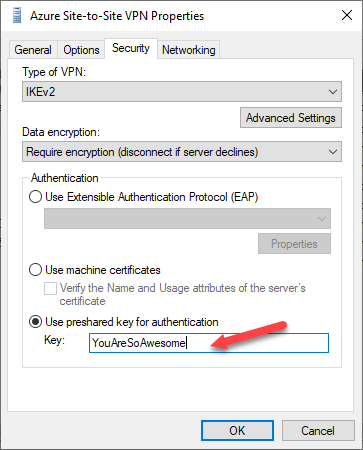
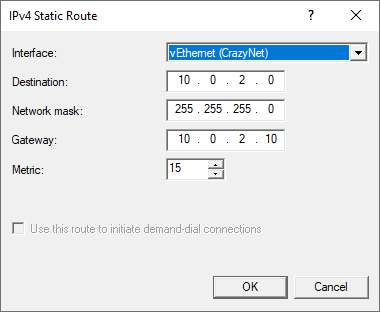
- Add another Static Route for CrazyNet
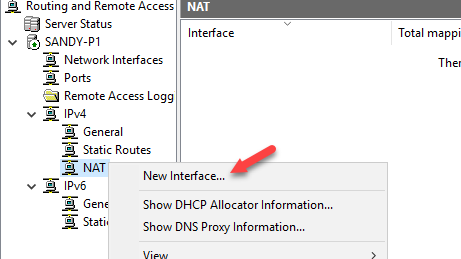
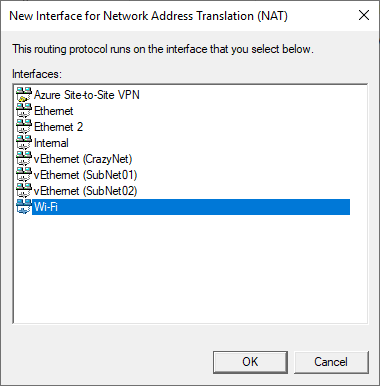
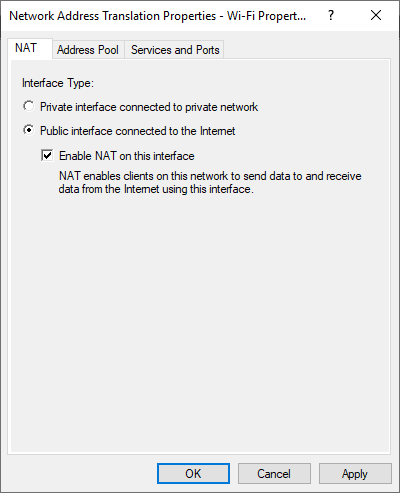
- I want to allow my internal switch access to internet, so I added my wifi network interface to NAT.
Create local network gateway and connection
- Create new resource in Azure, choose Local network gateway
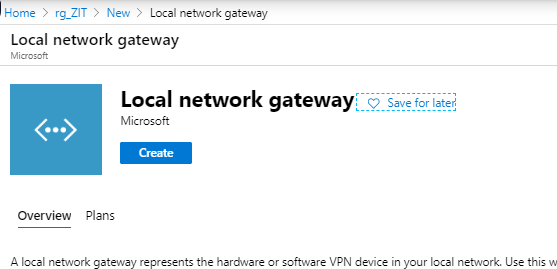
- I give a name HomeLab. IP address is your home network public IP, you can just go to web browser and search “What is my IP”.
IP address, this is address space that you wants to allow your home/local network communicate to your Azure network. For example my hypber-v virtual switch SubNet01 is 10.0.8.10, I put my DHCP ip scope as 10.0.8.0/24, so all my virtual machines that connects to SubNet01 will get ip address inside this scope, I want to allow those virtual machine communicate to my Azure network. So in local network gateway , I must add my local address 10.0.8.0/24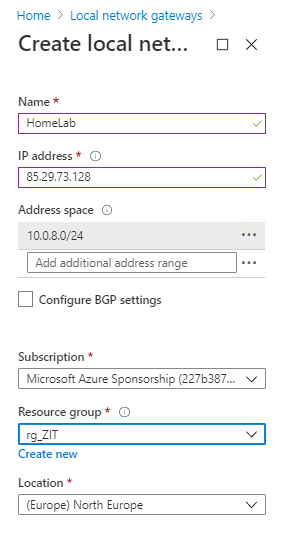
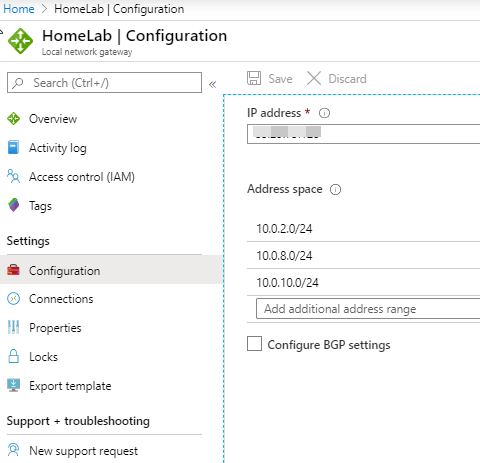
You can add more address space later as well. In my case, I added all my subnets
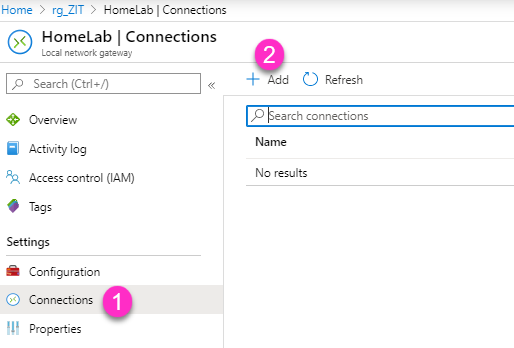
- After local network gateway is created, continue create new Connections
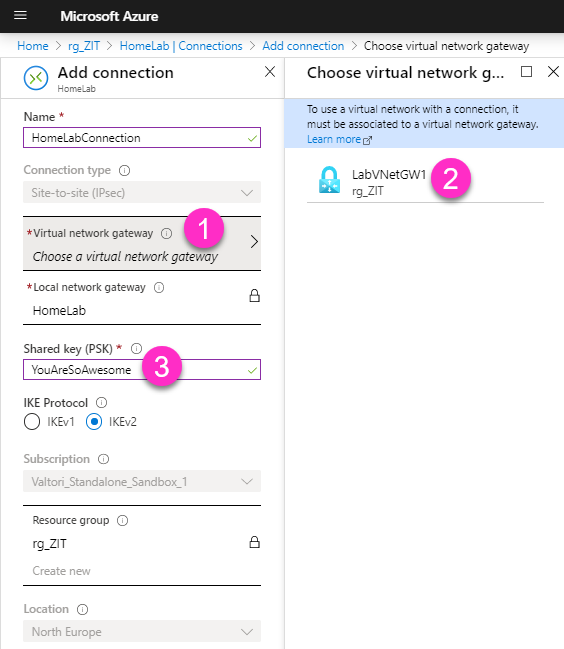
- Give a new connection name HomeLabConnection, choose your virtual network gateway. Input the same Shared key that you configured for your Demand-dial connection. Choose IKE Protocol IKEv2
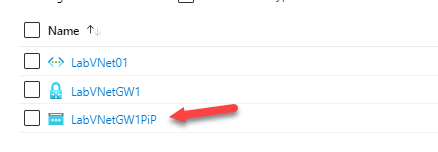
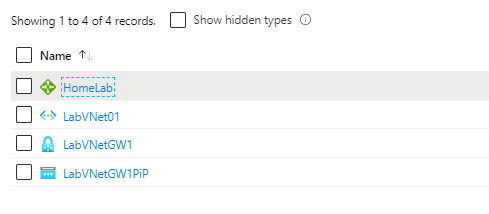
So after we have finished all those above steps, we should see in Azure portal resource group these four resources.
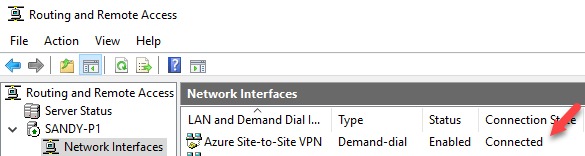
After we have configured everything ready, we should able to see Demand-dial connection is connected. If you don’t see anything, just open a command prompt, and ping an IP address that is in your Azure virtual network subnet range. In my case my Azure virtual network subnet is 10.2.0.0/24, so I just ping 10.2.0.1, and we should see connection state change to connecting immediately.
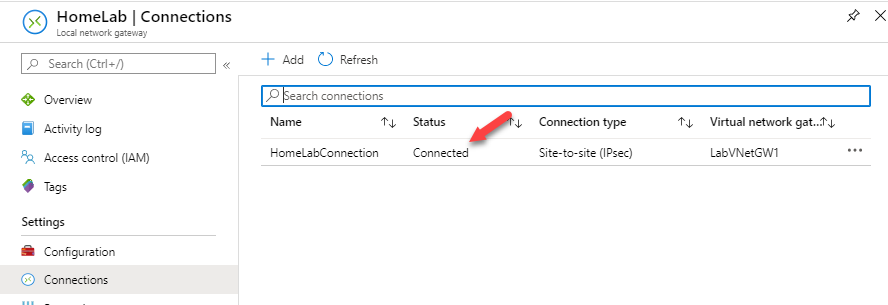
And we should see in Azure portal HomeLabConnection status is changed to Connected, this status change takes few minutes.
Now we have configured site-to-site VPN!
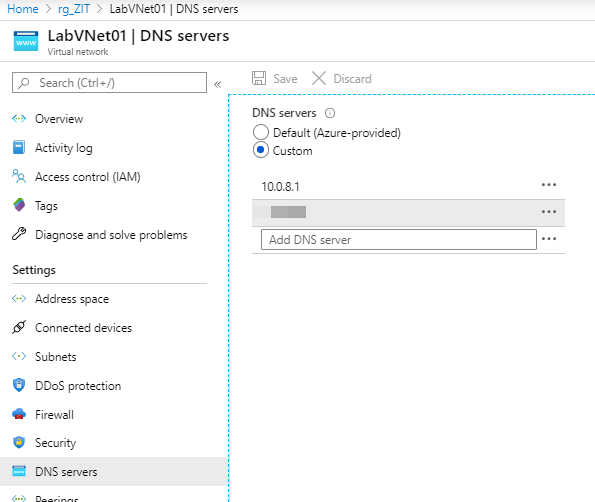
By default, Azure virtual network is using Azure provided DNS servers, if you are building a test lab like me and wants name resolution works, you can change DNS servers to your internal DNS.
Hope this help you start with setting up Azure site-to-site VPN, and without buying a supported device. 🙂