This is a long post….hope you have energy to read. 😀
Dell has a really nice post about How to configure PXE booting over UEFI without using Server 2012 and Windows Deployment Services, you can read this here.
In that post, sample is MDT.
I am going to do a SCCM scenario. You can watch this video see how my scenario of iPXE works. Just remember, secure boot is not supported, unless you sign your efi file.
Video is on YouTube. Part 1 and Part 2
Before you start build up your iPXE, I want you to think why you need iPXE, where are you going to put your iPXE server?
Usually in a big organization, you have lots of ip ranges, different subnets, so are you going to put a iPXE server in each subnet? What do you do after machines are boot up from iPXE? I guess you are using MDT or SCCM deploy OS, so where are you going to put those contents?
You can test iPXE any way your want, it is very flexible with embedded scripts. When you plan to use iPXE in production, first you need to have good knowledge about the infrastructure of your environments, how to you want iPXE to work and how to get benefits out of it. That is most difficult part.
In this post. I will present a scenario:
- You have multiple subnet ip range
- Using SCCM deploy Full OS.
- You might have local subnet DP in some of those ip ranges, but not all subnet has its own DP
- you don’t want to use usb boot media or offline installation media.
- Use http download boot.wim from iPXE server, it is faster than TFTP
Remember, everything you need will be attached end of this post, just not the SCCM boot file, and I won’t post you a windows 10 machine. 🙂
Prepare the boot.wim
(you can read also from http://ipxe.org/howto/sccm)
- Create a x64 boot media iso file from your SCCM Admin console.
- Mount the SCCM boot media iso file or unzip it.
- Copy sources\boot.wim to C:\wim\boot.wim
- You need to have ADK installed. Run “Deployment and Imaging Tools Environment” as Administrator.
- Use images mount C:\wim\boot.wim to c:\mount folder
imagex /mountrw C:\wim\boot.wim 1 c:\mount
- Mount the SCCM boot iso file or unzip it. Copy sms\data folder to c:\mount\sms folder, so it should look like this

- Create bootstrap.vbs file
Set os = WScript.CreateObject ( "WScript.Shell" )
os.Run "%COMSPEC%", 7, false
os.Run "%COMSPEC% /c title Initialising... && wpeinit " & "&& net start dnscache", 1, true
os.RegWrite "HKLM\SYSTEM\CurrentControlSet\Control\PEBootType", "Ramdisk:OpticalDrive", "REG_SZ"
os.Run WScript.ScriptFullName & "\..\TsmBootStrap.exe /env:WinPE " & "/configpath:%SYSTEMDRIVE%\sms\data", 1, true
- Create winpeshl.ini file.
[LaunchApps]
"wscript.exe","%SYSTEMDRIVE%\sms\bin\x64\bootstrap.vbs"
- copy winpeshl.ini to c:\mount\windows\system32
- copy bootstrap.vbs to c:\mount\sms\bin\x64
- copy c:\mount\sms\bin\x64\cmtrace.exe to c:\mount\windows\system32
- commit and unmount
imagex /commit /unmount c:\mount
Prepare Tiny PXE Server (example Windows 10)
- Download Tiny PXE server. http://reboot.pro/files/file/303-tiny-pxe-server/ (the link is quite slow, maynot work sometimes)
- Create C:\TFTPD folder, copy unziped tiny pxe server files to C:\TFTPD
- Create C:\TFTPD\iPXE folder
- Mount the SCCM boot media iso file or unzip it, copy everything to C:\TFTPD\iPXE
- copy modified boot.wim from “Prepare the boot.wim” to C:\TFTPD\iPXE\sources folder, overwrite the original boot.wim
- Download http://git.ipxe.org/releases/wimboot/wimboot-latest.zip, unzip it, copy only wimboot file to C:\TFTP\iPXE folder
- Create install.ipxe file in C:\TFTPD\iPXE folder
#!ipxe

:start
menu Please choose an operating system to install
item --gap Windows
item Windows10  Windows 10 Enterprise 64-bit
item --gap ipxe shell
item shell       Drop to iPXE shell

choose target && goto ${target}

:shell
echo Type 'exit' to get the back to the menu
shell
set menu-timeout 0
set submenu-timeout 0
goto start

:Windows10
set boot-url http://${next-server}
kernel ${boot-url}/wimboot
initrd ${boot-url}/BOOTMGR          BOOTMGR
initrd ${boot-url}/boot/bcd BCD
initrd ${boot-url}/Boot/BOOT.SDI BOOT.SDI
initrd ${boot-url}/SOURCES/BOOT.WIM BOOT.WIM
boot
boot || prompt --key s --timeout 10000 Chainloading failed, hit 's' for the iPXE shell; reboot in 10 seconds && shell || reboot
Prepare DHCP
Because we are doing ipxe boot cross different ip subnet, so you will have to manual put the boot server and boot file in DHCP
(Maybe can use iphelper with ipxe, I am not sure, but sorry I didn’t test iphelper. )
You can configure this with at least two options, they both works. Choose what is best for you or you can read more from ipxe.org and figure your own way.
Option 1 (I don’t write too much details for this one):
- Download http://erwan.labalec.fr/other/ipxe-snponly-x86-64.efi , or http://boot.ipxe.org/ipxe.efi, save the efi file to C:\TFTP\iPXE folder
- Break the infinite loop using DHCP (not script, because you are using the efi file from step 1). Read this http://ipxe.org/howto/chainloading and http://ipxe.org/howto/msdhcp#pxe_chainloading
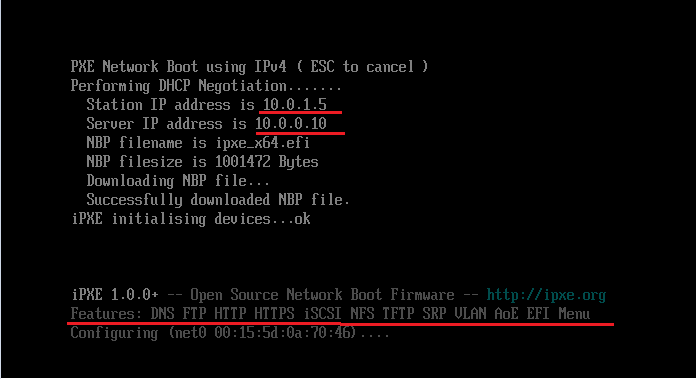
if you don’t do these settings in DHCP, you will have an infinite loop like this: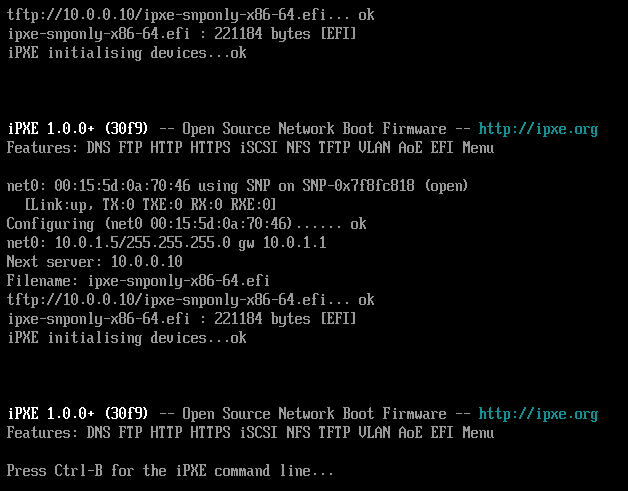
Option 2 : (Use embedded script, I use this one, everything you need will be attached end of this post)
- Generate your own boot file form this website https://rom-o-matic.eu (this moment when I am writing this, that server is down)
Advanced settings can read from https://wiki.fogproject.org/wiki/index.php?title=IPXE#rom-o-matic.eu - Embedded script (Noted, netboot chain tftp filename is install.ipxe, same name as we created earlier. Just make sure the name is same)
#!ipxe ifopen isset ${net0/mac} && dhcp net0 || goto dhcpnet1 echo Received DHCP answer on interface net0 && goto proxycheck :dhcpnet1 isset ${net1/mac} && dhcp net1 || goto dhcperror echo Received DHCP answer on interface net1 && goto proxycheck :dhcperror dhcp || prompt --key s --timeout 10000 DHCP failed, hit 's' for the iPXE shell; reboot in 10 seconds && shell || reboot :proxycheck isset ${proxydhcp/next-server} && isset ${next-server} && echo Duplicate option 66 (next server) from DHCP proxy and DHCP server && echo Using IP sent by DHCP proxy ${proxydhcp/next-server} && prompt --timeout 5000 || goto nextservercheck :nextservercheck isset ${proxydhcp/next-server} && set next-server ${proxydhcp/next-server} || isset ${next-server} && goto netboot || goto setserv :setserv echo -n Please enter tftp server: && read next-server && goto netboot || goto setserv :netboot chain tftp://${next-server}/install.ipxe || prompt --key s --timeout 10000 Chainloading failed, hit 's' for the iPXE shell; reboot in 10 seconds && shell || reboot - I want to prepare my efi file to support https, I created my ipxe_x64.efi file using advanced settings.
- Copy ipxe_x64.efi file to C:\TFTP\iPXE folder
- Configure your DHCP like this:
066 Boot Server Host Name, put your ipxe server name here, or it’s ip.
067 Bootfile Name, ipxe_x64.efiWith these settings, if there is PXE enabled Distrubution Point on same subnet, machine will use the normal PXE boot from your PXE DP.
But if there is no PXE enabled Distribution Point on same subnet, machine will boot from the iPXE server and use http download boot.wim.

Tiny PXE Server
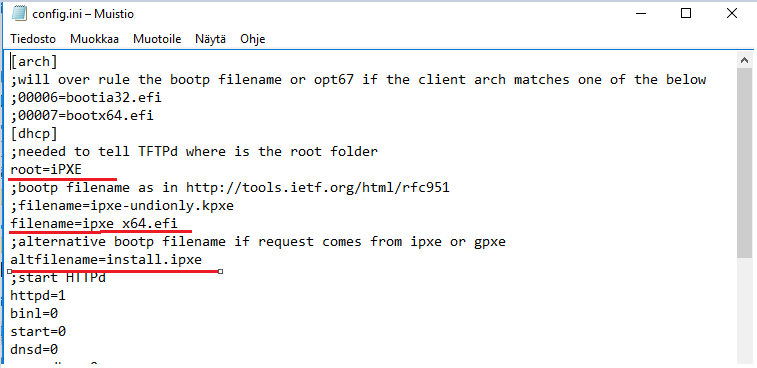
- Modify config.ini
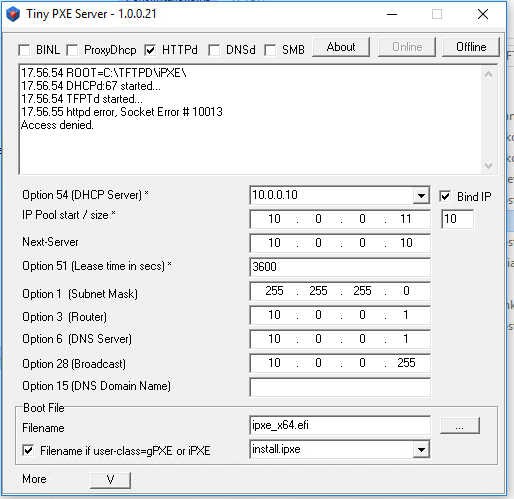
- Fire up pxesrv.exe, it should look like as this picture shows. Click “Online”

- And…. you might see httpd error, Socket Error # 10013, Access denied. WHAT???? Trust me, you won’t find much answers from google or bing. 🙂
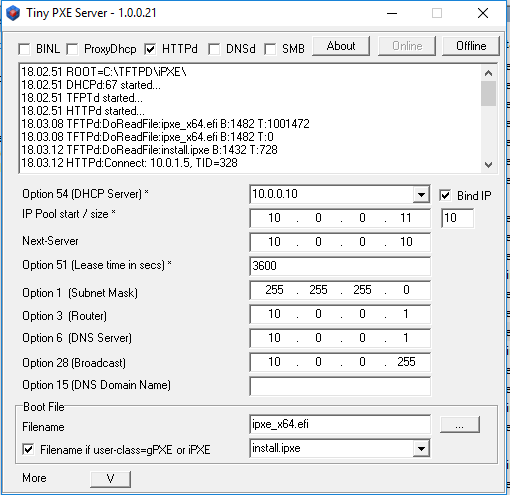
- In my case, it was cause by BranchCache.
Super much thanks for , he pointed out that I don’t need to disable BranchCache, just need to change the port, BranchCache use default port 80.
Here is more information privided by Phil. Really good to read them!
https://2pintsoftware.com/faq/
http://code.avalon-zone.be/distributed-branchcache-change-default-tcp-port/ - Then put Tiny PXE server online again. Boot up your client machine without secure boot.
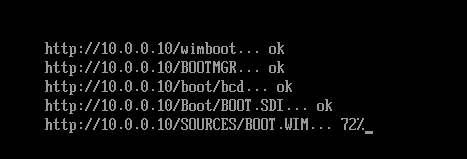
So, that’s all. Here are some screenshots

You can download the package from my OneDrive. Click here.
Please don’t ask me about embedded scripts, I didn’t write that script, found it from github, too bad didn’t mark down the link.
Have fun test iPXE, you will like it!
PS. You can make it work with Legacy and UEFI boot. You just need to configure DHCP policy. Read this https://2pintsoftware.com/whitepaper-using-dhcp-uefi-bios-pxe-booting/
Hello,
Nice post. As I tweeted at you earlier, are you able to successfully select the Task Sequence and have it progress without downloading the new boot image? Since you have to modify the boot image after you update DPs, it detects a different version and thus tries to download a matching one.
Modifying SMS\data\TSMbootstrap.ini to have Unattended=True works around this for me.
I didn’t need to re-download the boot image as you can see in the video. If you first distribute boot wim content to DP, create a boot media, modify the boot.wim what is from the boot media, no need to import boot wim or update content again. It won’t re-download the boot wim again during TS. Would you try my steps? I will test the Unattended trick tomorrow. Thanks for the information!
Interesting. I tried exactly that “distribute boot wim content to DP, create a boot media, modify the boot.wim what is from the boot media” and it would still see it as a different boot image. I’m also using wimboot in conjunction with iPXE…I wonder if that makes a difference.
http://ipxe.org/wimboot
Hi Brooks. Do you want we take a look of your setup together? Can try organize a Skype session after 4.30pm UTC+3. DM me in Twitter. 🙂
Hi Brooks, I just upload two video in YouTube how I make the boot.wim and prepare iPXE folder. https://youtu.be/daLEqXxVRZw and https://youtu.be/Y05wNohUOqQ
I tried the TSMbootstrap.ini Unattended=True , but it didn’t work for my scenario, it only loop back to pxe boot.
Do you have any Information about signing the EFI File for Secure Boot?
I am not an expert of certificate, the EV code signing cost about 500 dollars for three year, I didn’t buy it. 🙂 But here are some information from ipxe.org http://ipxe.org/appnote/etoken
I think there are some discussion about that in ipxe.org forums.
Also can try use https. Here is the link http://ipxe.org/crypto
During my test with Lenovo T450s, I added some steps in TS to set Lenovo BIOS settings, and I use that to set secure boot back to enabled.
Thanks!
Can we use this on HP devices where when secure boot is enabled and legacy is disabled, the PXE boot is not working. On all our HP Elitedesk G2/3 models, we have secure boot enabled by default. So when we do a PXE boot on a bare metal, the device does not get the boot image. So can we use the IPXE here ?
Without code signed, iPXE does not work with UEFI secure boot. So this free iPXE solution only work with UEFI without secure boot.
You forgot to mention you need to copy over the bootstrap.vbs file to the sms\bin\x64\ folder. made me look 5 times.
Roy, thanks for pointing it out. updated my post. Thank you again.
after being occupied with other stuff i picked up where I left off and tried using the bootable media option. it starts and loads up. but after booting into the prestage it fails with the following errors:
Failed to configure adapter 0 (0x80220014)
Failed to configure network settings for adapter 1 (0x80220014)
Execution failed with error 80220014
I found the following article that describes this error precisely: https://blogs.technet.microsoft.com/configurationmgr/2016/03/03/hotfix-windows-pe-boot-images-from-winadk-fail-to-initialize-and-log-error-code-0x80220014/
our SCCM is up to 1710 with two hotfixes to go. shouldnt the above hotfix already be applied to my bootable media?
Would love to see your input into this.
Kind regards,
Roy
Hi Roy, if you don’t use iPXE, does normal PXE works? What ADK are you using? I have not tested iPXE after I wrote this post, I will test it again when I find some time.
Hi Sandy,
Another year past and now im creating new boot.wim files from updated sccm media boot.
After following the tutorial I tried testing the files. it loads up nicely but after a few second it reboots. Any idea where i need to search? because I tried starting CMtrace to keep de winpe running but it forces the reboot.
I have checked the files needed for this to work with the ones from my first working boot.wim and they are the same.
Kind regards,
Roy
I should note that what it starts is the background with only two command prompts one is open the other minimized. the one thats open saying its starting DNS….. and then reboots.
so no sccm wizard.
Hello Roy, I haven’t test iPXE since I wrote this post, not sure what has changed, honestly I can’t tell what went wrong before I have time test this again.
Hi Sandy,
I have an Standalone Iso i managed to boot following your guide and thank you for that.
But then it asks me to insert Task sequence media #1 and click ok to proceed, any thoughts on how to make it work ? the media is split in three .swm files. All available in SMS\PKG\*****202\ folder
Hi Robert, my guide should be just download boot. It doesn’t not take care of the actual task sequence media. I haven’t test this with standalone iso. Sorry can’t much help here. Haven’t test this for long time.
I know what it is old post , but I want to add something
As some colleagues I faced with some error and reboot when I try boot from boot.wim in iPXE
I did some things that Sandy describes but instead using vbs files I just edit winpeshl.ini in system32 with some registry tweak
[LaunchApps]
%WINDIR%\system32\cmd.exe, /c wpeinit
%WINDIR%\system32\cmd.exe, /c net start dnscache
%WINDIR%\system32\cmd.exe, /c reg add “HKLM\SYSTEM\CurrentControlSet\Control” /v PEBootType /t REG_SZ /d “Error” /f
%WINDIR%\system32\cmd.exe, /c reg add “HKLM\SYSTEM\CurrentControlSet\Control” /v SystemStartOptions /t REG_SZ /d ” MININT RDIMAGEOFFSET=8192 RDIMAGELENGTH=3161088 RDPATH=NET(0)\\SMSIMAGES\\THQ00003\\WINPE.THQ00003.WIM” /f
%WINDIR%\system32\cmd.exe, /c reg add “HKLM\SYSTEM\CurrentControlSet\Control” /v FirmwareBootDevice /t REG_SZ /d “ramdisk(0)” /f
%WINDIR%\system32\cmd.exe, /c reg add “HKLM\SYSTEM\CurrentControlSet\Control” /v PEBootTypeErrorCode /t REG_DWORD /d “2147942413” /f
%WINDIR%\system32\cmd.exe, /c reg add “HKLM\SYSTEM\CurrentControlSet\Control\PXE” /v DHCPServerACK /t REG_BINARY /d “” /f
%WINDIR%\system32\cmd.exe, /c reg add “HKLM\SYSTEM\CurrentControlSet\Control\PXE” /v BootServerReply /t REG_BINARY /d “” /f
%SYSTEMDRIVE%\sms\bin\x64\TsBootShell.exe
May be it will be usefull to someone